Cross posted from blog.n1analytics.com
At N1 Analytics we use Kubernetes for running experiments, continuous integration testing and deployment. In this post I document setting up a Kubernetes cluster to automatically provision TLS certificates from Let’s Encrypt using Jetstack’s Certificate Manager, the helm package manager and the nginx-ingress controller.
I wrote this after migrating our cluster from traefik to use cert manager and nginx-ingress. The end state will be one where we can create Kubernetes ingress with a TLS certificate with only a set of annotations in the respective helm template.
I’m going to assume some background knowlege for this post, if you haven’t heard of Let’s Encrypt and Kubernetes - you may want to read up on those first! To follow along you will need access to a kubernetes cluster and the kubectl tool.
There are a lot of moving pieces in the Kubernetes landscape, one of the most common methods of provisioning TLS certificates was kube-lego - also by Jetstack. However they have marked kube-lego as entering maintanence only and suggest to instead use their replacement project cert-manager. cert-manager takes a more kubernetes native approach to certificate provisioning and management. By using Kubernete’s support for custom resource types they introduce resources for certificate issuers and for certificates respectively.
To get there we need the following steps:
- Install helm
- Install nginx-ingress using helm
- Point your domains DNS at the ingress controller
- Install cert-manager using helm
- Create an Issuer for letsencrypt-staging
- Create a Certificate resource and verify that cert-manager could issue it using the staging issuer
- Create a test ingress with manual TLS certificate
- Create a letsencrypt-production Issuer and configure your deployments to use it
- Create ingress with automatic TLS using the letsencrypt-staging issuer and the ingress-shim
- Using a cluster wide issuer
- Supporting cert-manager in your own charts
Install Helm
Helm is the defacto package manager for kubernetes. With helm you can install packages of pre-configured Kubernetes resources, and share your applications as a chart. In the rest of this post I’m going to assume you have it set up. With helm, software gets packaged up as charts which essentially provides templated deployments.
Assuming you already have kubectl setup to access a kubernetes cluster, you can easily follow the helm installation docs for your platform.
It is recommend to install helm with RBAC support. If you already have helm installed without RBAC, you can upgrade it in place:
$ helm init --service-account tiller --upgrade
In either case it is a good idea to pull the latest charts with:
$ helm repo update
Now that you have the helm tool we can use it to install software from the stable charts repository or to package our own containerised software for installation into any Kubernetes cluster.
Install Nginx Ingress
This step is optional if you already have another ingress controller - e.g. the ingress controller provided on Google Cloud Platform. In my case I was using the Traefik ingress controller which has inbuilt Let’s Encrypt support and decided to replace it with nginx-ingress and cert-manager. Another option is to configure the ingress controllers to only service particular namespaces.
As with installing any helm chart take a look at the options in the chart’s readme, customize the chart as required for your environment, then install into the kube-system namespace:
$ helm install --namespace kube-system --name nginx-ingress stable/nginx-ingress --set rbac.create=true
A tip for reproducible builds, create your own nginx-ingress.yaml file with any custom values and keep it in version control. The install command then becomes:
$ helm install --namespace kube-system --name nginx-ingress stable/nginx-ingress --values nginx-ingress.yaml
By default the nginx-ingress controller will only service ingresses that have a kubernetes.io/ingress.class annotation set to nginx:
annotations:
  kubernetes.io/ingress.class: nginx
Once the ingress controller is up it will be exposed as a Kubernetes service with an external address. On AWS this will be a FQDN for a load balancer - looking something like this:
$ kubectl --namespace kube-system get services -o wide -w nginx-ingress-controller
XXXXXX-YYYYY.ap-southeast-2.elb.amazonaws.com
Not on AWS? Different clusters may have different approaches to route traffic to the ingress controller, look at adjusting the controller.service.type in the charts values.
To show all configurable values you can inspect the chart:
$ helm inspect values stable/nginx-ingress
Update DNS
Point your domains at the ingress controller’s external address. I create a CNAME for each root domain. e.g.
*.n1analytics.com will point to XXXXXX-YYYYY.ap-southeast-2.elb.amazonaws.com
Check that the DNS has worked by using dig with your domains:
$ dig dummy.n1analytics.com
You should see the CNAME pointer you created in the answer section. Actually check your DNS before proceeding, you’ll just not have fun if you have DNS configuration problems. If you are running at home or on a bare metal cluster this is almost certainly the first major hurdle.
At this point the ingress controller should respond to HTTP and HTTPS requests with a default backend - 404 response too. For example using httpie we can see the nginx ingress respond with a 404:
$ http dummy.n1analytics.com
HTTP/1.1 404 Not Found
Connection: keep-alive
Content-Length: 21
Content-Type: text/plain; charset=utf-8
Date: Mon, 12 Feb 2018 21:46:44 GMT
Server: nginx/1.13.8
Strict-Transport-Security: max-age=15724800; includeSubDomains;

default backend - 404
Install Cert Manager
The component responsible for provisioning TLS certificates is cert-manager. Follow the deployment guide.
As the helm chart is not yet in the stable repository you need to first do a git checkout:
$ git clone https://github.com/jetstack/cert-manager
$ cd cert-manager
$ git checkout v0.2.3
$ helm install --name cert-manager --namespace kube-system cert-manager/contrib/charts/cert-manager
Update The cert-manager chart has landed in stable. All you should need to do is:
$ helm install --name cert-manager --namespace kube-system stable/cert-manager
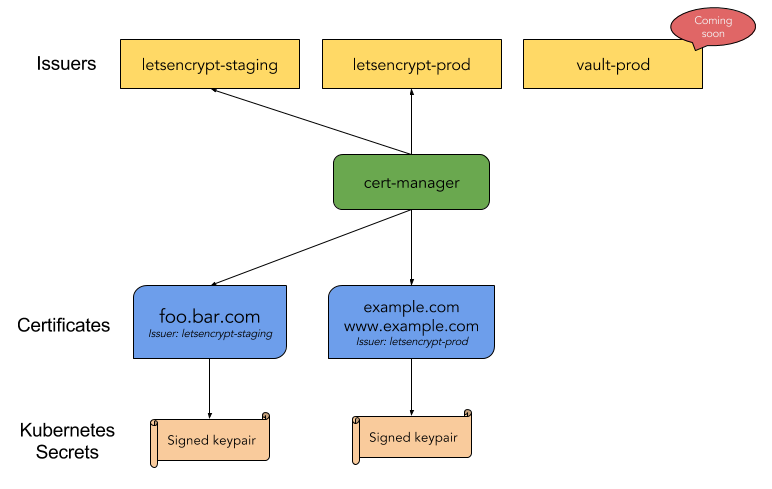
cert-manager needs certificate Issuers in order to provision TLS Certificates. Like most of kubernetes, cert-manager takes a declarative approach; a Certificate contains the information required to make a certificate signing request for a given Issuer (Certificate Authority). cert-manager will negotiate with the Issuer (e.g. Let’s Encrypt) to provision a certificate and will create a kubernetes secret with the TLS type that contains the keypair. This keypair can be referenced in an Ingress for nginx-ingress to use when creating the TLS terminating proxy route. Don’t worry if this all sounds wildly complicated, this post will be going through most of it manually to unpack what happens.
For debugging it can be very useful to watch the cert-manager logs:
$ kubectl logs deployment/cert-manager-cert-manager cert-manager --namespace kube-system -f
(The second cert-manager refers to one of the two containers inside the pod - the other is ingress-shim which we will get to later)
Create Staging Issuer
Because it is easy to have an incorrect configuration it is strongly recommended to first use the Let’s Encrypt staging api. This has a much more forgiving rate limit than the production api.
Following the HTTP validation user guide we can create an Issuer for the Let’s Encrypt staging api by creating an acme-staging-issuer.yaml file:
apiVersion: certmanager.k8s.io/v1alpha1
kind: Issuer
metadata:
  name: letsencrypt-staging
spec:
  acme:
    # The ACME server URL
    server: https://acme-staging.api.letsencrypt.org/directory
    # Email address used for ACME registration
    email: certificates@example.com
    # Name of a secret used to store the ACME account private key
    privateKeySecretRef:
      name: letsencrypt-staging
    # Enable the HTTP-01 challenge provider
    http01: {}
Change the email address and do the normal kubectl create -f acme-staging-issuer.yaml to create the Issuer resource in the default namespace. cert-manager uses a CustomResourceDefinition for Issuers and Certificates - so there is first class support in the kubectl tool:
$ kubectl get issuers
letsencrypt-staging   1m
$ kubectl describe issuer letsencrypt-staging
Name:         letsencrypt-staging
Namespace:    default
Labels:       <none>
Annotations:  <none>
API Version:  certmanager.k8s.io/v1alpha1
Kind:         Issuer
...
Create Test Certificate
To test our staging Issuer we will create a Certificate resource which describes a certificate we would like provisioned. In this example we will create a certificate for the domain dummy.n1analytics.com. For illustrative purposes we will also make sure the certificate is valid for www.dummy.n1analytics.com with an alternative subject name.
Create a dummy-staging-cert.yaml file:
apiVersion: certmanager.k8s.io/v1alpha1
kind: Certificate
metadata:
  name: dummy-n1analytics-com
  namespace: default
spec:
  secretName: dummy-n1analytics-com-tls
  issuerRef:
    name: letsencrypt-staging
  commonName: dummy.n1analytics.com
  dnsNames:
  - dummy.n1analytics.com
  - www.dummy.n1analytics.com
  acme:
    config:
    - http01:
        ingressClass: nginx
      domains:
      - dummy.n1analytics.com
      - www.dummy.n1analytics.com
The commonName and dnsNames sections give you control of the Subject Alternative Names and common name sections of the provisioned TLS certificate.
The acme section configures how cert-manager will prove to Let’s Encrypt that we own the domain. In this case we have chosen to use the HTTP-01 challenge type. Because we are using nginx-ingress we set the http01.ingressClass to nginx so that when cert-manager creates an ingress for the Let’s Encrypt http challenge it will include the required nginx annotation.
There is much more information in the guide - well worth reading through especially if your setup is a bit different.
If you’re planning on issuing certificates for LAN internal addresses or resources with additional protection such as IP whitelisting, you should look at the DNS challenge type. You can set up a DNS resource on AWS or GCE and have cert-manager adjust the TXT entries to satisfy the challenge.
When you’re happy, create the Certificate resource:
$ kubectl create -f dummy-staging-cert.yaml
We can list any certificates with kubectl:
$ kubectl get certificates
NAME               AGE
dummy-data61-xyz   1m
And ask for a description:
$ kubectl describe certificate dummy-data61-xyz
Name:         dummy-data61-xyz
  <SNIP>
  Conditions:
    Last Transition Time:  2018-02-06T22:21:30Z
    Message:               Certificate issued successfully
    Reason:                CertIssueSuccess
    Status:                True
    Type:                  Ready
Events:
  Type    Reason               Age                From                     Message
  ----    ------               ----               ----                     -------
  Normal  PrepareCertificate   1m                 cert-manager-controller  Preparing certificate with issuer
  Normal  PresentChallenge     1m                 cert-manager-controller  Presenting http-01 challenge for domain dummy.data61.xyz
  Normal  SelfCheck            1m                 cert-manager-controller  Performing self-check for domain www.dummy.data61.xyz
  Normal  SelfCheck            1m                 cert-manager-controller  Performing self-check for domain dummy.data61.xyz
  Normal  ObtainAuthorization  50s                cert-manager-controller  Obtained authorization for domain dummy.data61.xyz
  Normal  ObtainAuthorization  44s                cert-manager-controller  Obtained authorization for domain www.dummy.data61.xyz
  Normal  IssueCertificate     43s                cert-manager-controller  Issuing certificate...
  Normal  CeritifcateIssued    43s                cert-manager-controller  Certificated issued successfully
  Normal  RenewalScheduled     43s (x2 over 43s)  cert-manager-controller  Certificate scheduled for renewal in 1438 hours
In this case everything went well. Behind the scenes cert-manager created pods and ingresses to address the HTTP-01 challenge from Let’s Encrypt and succefully issued a certificate!
Now the certificate’s key pair will be in a kubernetes secret - in our case called dummy-n1analytics-com-tls
$ kubectl describe secret dummy-n1analytics-com-tls
Name:         dummy-n1analytics-com-tls
Namespace:    default
Type:  kubernetes.io/tls

Data
====
tls.crt:  3464 bytes
tls.key:  1679 bytes
Manually enable TLS for nginx
We will now create an ingress that uses our TLS secret to serve HTTPS traffic. I’m going to temporarily expose the kubernetes-dashboard which I install with helm. You could manually create an ingress pointing at an existing service, but I’m going to create a test dashboard using the following k8s-dashboard.yaml values:
ingress:
  enabled: true
  hosts:
    - dummy.n1analytics.com
  tls:
  - hosts:
    - dummy.n1analytics.com
    secretName: dummy-n1analytics-com-tls
Note this ingress is referencing the TLS secrets that cert-manager created when provisioning our Certificate. This is a standard kubernetes ingress with TLS - nothing specific for nginx-ingress or cert-manager.
Note you can also add extra annotations to the ingress to include things like basic authentication - which would be a very good idea if you were actually going to expose your kubernetes dashboard to the internet!
Install with helm:
$ helm install --name temp-k8s-dash --namespace=default stable/kubernetes-dashboard --values k8s-dashboard-values.yaml
After a short delay you should be able to visit https://dummy.n1analytics.com/ and see that the Let’s Encrypt staging certificate was used.
In short, to have an ingress use an existing TLS secret you have to add a tls section to the ingress resource.
Production Issuer
To move to the Let’s Encrypt production server simply create a new Issuer with the URL set to https://acme-v01.api.letsencrypt.org/directory
Example acme-issuer.yaml to create an Issuer with the name letsencryt:
apiVersion: certmanager.k8s.io/v1alpha1
kind: Issuer
metadata:
  name: letsencrypt
spec:
  acme:
    # The ACME production api URL
    server: https://acme-v01.api.letsencrypt.org/directory
    # Email address used for ACME registration
    email: certificates@example.com
    # Name of a secret used to store the ACME account private key
    privateKeySecretRef:
      name: letsencrypt-production
    # Enable the HTTP-01 challenge provider
    http01: {}
Create that Issuer and - as you can guess - any Certificate resources that have an issuerRef of letsencrypt will now use the production Let’s Encrypt service instead.
To test it create a prod-cert.yaml file:
apiVersion: certmanager.k8s.io/v1alpha1
kind: Certificate
metadata:
  name: dummy-n1analytics-com
  namespace: default
spec:
  secretName: dummy-n1analytics-com-tls
  issuerRef:
    name: letsencrypt
  commonName: dummy.n1analytics.com
  dnsNames:
  - dummy.n1analytics.com
  acme:
    config:
    - http01:
        ingressClass: nginx
      domains:
      - dummy.n1analytics.com
In this case we will delete the staging certificate and TLS secret:
$ kubectl delete certificate certificate dummy-n1analytics-com
$ kubectl delete secret dummy-n1analytics-com-tls
Create the production certificate and the ingress should start using the new credentials:
$ kubectl create -f prod-cert.yaml
Using the Ingress Shim
This was a very manual approach to try walkthrough and understand what is happening. Instead we want cert-manager to watch for new ingress resources and then automatically provision TLS certificates for us. Luckily it can do that out of the box using an ingress-shim. Fair warning the ingress-shim is experimental:
This project is experimental, and thus should not be relied upon in a production environment. This tool may change in backwards incompatible ways.
All we need to do is add an certmanager.k8s.io/issuer annotation to an ingress. The issuer must exist in the same namespace as the ingress.
Most standard charts have support for adding ingress annotations directly. For our running example, adding annotations to k8s-dashboard-values.yaml would look like this:
ingress:
  enabled: true
  hosts:
    - k8s.n1analytics.com
  tls:
  - hosts:
    - k8s.n1analytics.com
    secretName: k8s-n1analytics-com-tls
  annotations:
    certmanager.k8s.io/issuer: letsencrypt
Note the secretName defined here will be used by the ingress shim to create the kubernetes secret containing the TLS keypair.
Cluster wide
Issuers don’t have to be namespaced. Create a ClusterIssuer following the user guide.
apiVersion: certmanager.k8s.io/v1alpha1
kind: ClusterIssuer
metadata:
  name: letsencrypt-cluster-issuer
spec:
  acme:
    # The ACME production api URL
    server: https://acme-v01.api.letsencrypt.org/directory
    # Email address used for ACME registration
    email: certificates@example.com
    # Name of a secret used to store the ACME account private key
    privateKeySecretRef:
      name: letsencrypt-cluster-key-pair
    # Enable the HTTP-01 challenge provider
    http01: {}
To use with the ingress shim simply switch your ingress annotation to certmanager.k8s.io/cluster-issuer. Fair warning I had some trouble with the interaction between the ingress shim and the cluster issuer when you have other annotations on your ingress - cert-manager#286. For now the recommended approach is to create certificates directly - these can refer to the cluster issuer.
To clean up remove the manually deployed secrets and certificates:
$ kubectl delete certificate dummy-n1analytics-com
$ kubectl delete secret dummy-n1analytics-com-tls
Delete and purge the helm deployment too:
$ helm delete --purge temp-k8s-dash
Custom Charts
So you want to add support for cert-manager in your own software? When the ingress shim is fully working this is as easy as allowing your chart’s users to provide ingress annotations.
In your values.yaml you should make sure you have an ingress.annotations array. See the kubernetes-dashboard for example. Note that it is much easier for users if you provide commented out examples:
ingress:
  enabled: true

  ## Ingress annotations
  ##
  annotations: []
   # kubernetes.io/ingress.class: nginx
   # certmanager.k8s.io/issuer: letsencrypt
Then in your ingress template you should add the annotations to the metadata:
apiVersion: extensions/v1beta1
kind: Ingress
metadata:
{{- if .Values.api.ingress.annotations }}
  annotations:
{{ toYaml .Values.api.ingress.annotations | indent 4 }}
{{- end }}
Also the ingress will have to have a TLS section in the spec:
{{- if .Values.api.ingress.tls }}
tls:
{{ toYaml .Values.api.ingress.tls | indent 4 }}
{{- end -}}
While issue cert-manager#286 is still open, the recommended approach is to create certificates instead of relying on the ingress shim. For this I’d recommend adding a certManager section to your values file:
# Configure a cert-manager Certificate (caution experimental!)
certManager:
  enabled: true
  secretName: dummy-n1analytics-com-tls
  issuerRef:
    #name: letsencrypt
    name: letsencrypt-cluster-issuer
    kind: ClusterIssuer
  # Note commonName must also be in ingress.hosts
  commonName: dummy.n1analytics.com
It is worth noting that some of this information is duplicated in the ingress section. You may wish to add a section for multiple hosts as Let’s Encrypt and the ingress controller would support that.
To use these values create a certificate.yaml template:
{{- if .Values.api.certManager.enabled }}
apiVersion: certmanager.k8s.io/v1alpha1
kind: Certificate
metadata:
  name: {{ template "fullname" . }}
  labels:
    app: {{ template "fullname" . }}
    chart: {{ .Chart.Name }}-{{ .Chart.Version }}
    release: {{ .Release.Name }}
    heritage: "{{ .Release.Service }}"
spec:
  secretName: {{ .Values.api.certManager.secretName }}
  issuerRef:
{{ toYaml .Values.api.certManager.issuerRef | indent 4 }}
  commonName: {{ .Values.api.certManager.commonName }}
  acme:
    config:
    - http01:
        ingressClass: nginx
      domains:
      {{- range .Values.api.ingress.hosts }}
      - {{ . }}
      {{- end }}
  dnsNames:
  {{- range .Values.api.ingress.hosts }}
  - {{ . }}
  {{- end -}}
{{- end -}}
Good luck!
![]()