This is a follow up post combing pure Python Bluetooth sockets with pure Python websockets. Pure Python meaning no imports outside of the standard library and not using ctypes.
I decided my i-Racer car needed to have a much better user interface than my Python3 API. I mean when I first got it, typing car.forwards() was enough to impress me but no longer. For a while now I've been wanting to invest some of my time getting better at this web stuff. One of the suggestions I got prior to my Kiwi PyCon talk was to use websockets, problem was I didn't know much javascript yet alone websockets!
I started by looking at the Python libraries that implement websockets, tornado has one but I didn't want a whole web framework. The largest library is mod-pywebsocket. Unfortunately their API doesn't appear to easily lend itself to extension, and it is only Python2 which wouldn't play nicely with my Python3 bluetooth socket connection to the car. Their example applications have proved very valuable though.
After getting a bit of guidance from stack overflow I managed to implement enough of the protocol to create my own pure python websocket server. If you're interested my (rather rough) code is on bitbucket as websocket.py. It is quite low level code with plenty of bit manipulation routines etc:
This wireless car application used websocket.py along with my bluetooth_car.py module to create a webserver that allowed me to drive my toy car over the internet. I came up with a very simple JSON protocol which would allow easy preprogrammed commands like up or left or stop, and also gave the ability to transfer raw command data from the browser.
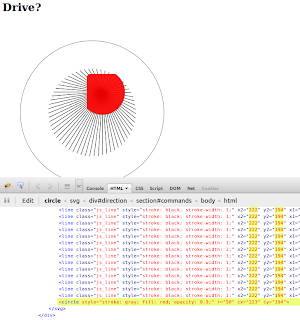
Next challenge was creating the controller - I was aiming for a joystick that could be dragged around. Naturally flash, silverlight, and java apps were not considered a viable solution. After weighing up pros and cons of canvas and svg , I finally settled on a dynamic SVG. Plenty of javascript libraries exist for visualizations, the one I liked the most is called d3. Used by the New York Times to good effect last week creating: "Over the decades, how states have shifted".
The bulk of my javascript was made up of very simple drawing commands, the following section is responsible for creating a new websocket and after a connection to the car is made - binding the buttons to events:
To create the buttons I had mapped an array of button names ["left", "right", etc] as data:
So the d3.selectAll(".command_button").on("click", car.update) line is almost misleadingly powerful - it is passing that original bit of data used in creating the button through to car.update, since this data was the command name that function can json encode it and send it down the websocket to the server. Too easy!

So although it might not look like much, I was rather proud to drive my bt remote control car via a websocket. The html and javascript can be found at car.html in my bitbucket repository for socket examples.
I found Google Chrome was much much faster than Firefox. If the red "knob" had opacity in firefox it wouldn't render it properly as a circle! That has me a bit worried, luckily this was just a "toy" for myself and I happen to be a Chrome user.
I decided my i-Racer car needed to have a much better user interface than my Python3 API. I mean when I first got it, typing car.forwards() was enough to impress me but no longer. For a while now I've been wanting to invest some of my time getting better at this web stuff. One of the suggestions I got prior to my Kiwi PyCon talk was to use websockets, problem was I didn't know much javascript yet alone websockets!
I started by looking at the Python libraries that implement websockets, tornado has one but I didn't want a whole web framework. The largest library is mod-pywebsocket. Unfortunately their API doesn't appear to easily lend itself to extension, and it is only Python2 which wouldn't play nicely with my Python3 bluetooth socket connection to the car. Their example applications have proved very valuable though.
After getting a bit of guidance from stack overflow I managed to implement enough of the protocol to create my own pure python websocket server. If you're interested my (rather rough) code is on bitbucket as websocket.py. It is quite low level code with plenty of bit manipulation routines etc:
def receive(s):
    """blocking call to receive data from client"""

    # read the first two bytes
    frame_head = s.recv(2)
    frame_head = frame_head
    assert is_bit_set(frame_head[1], 7)

    # length of payload
    # 7 bits, or 7 bits + 16 bits, or 7 bits + 64 bits
    payload_length = frame_head[1] & 0x7F
    if payload_length == 126:
        raw = s.recv(2)
        payload_length = bytes_to_int(raw)
    elif payload_length == 127:
        raw = s.recv(8)
        payload_length = bytes_to_int(raw)
    print('Payload is {} bytes'.format(payload_length))

    """masking key
    All frames sent from the client to the server are masked by a
    32-bit nounce value that is contained within the frame
    """

    masking_key = s.recv(4)

    # finally get the data:
    masked_data_in = s.recv(payload_length)
    data = bytearray(payload_length)

    # The ith byte is the XOR of byte i of the data with
    # masking_key[i % 4]
    for i, b in enumerate(masked_data_in):
        data[i] = b ^ masking_key[i % 4]

    return data
#!/usr/bin/env python3

"""
JSON format expected:
    {
        'command': 'stop'|'up'|'down'|'left'|'right','raw',
        'duration': time_in_seconds,
        'data': raw_int_command
    }
"""

from threading import Thread, Event
from time import sleep
import json
import http.server
import socketserver

import websocket
from bluetooth_car import BluetoothCar

stop = Event()

def driver(s):
    car = BluetoothCar()
    duration = 0.1

    commands = {
        'up': car.forwards,
        'down': car.reverse,
        'left': car.left,
        'right': car.right
        }

    while not stop.is_set():
        raw_data = websocket.receive(s).decode()
        print(raw_data)
        data = json.loads(raw_data)
        command = data['command']

        if 'duration' in data and data['duration'] is not None:
            duration = data['duration']

        if command in commands:
            print(command)
            commands[command](duration)
        elif command == "raw":
            raw_command = data["data"]
            print("raw command: ", raw_command)
            car.drive(raw_command)


def run():
    WS_PORT = 9876
    HTTP_PORT = 8000

    ws = websocket.Websocket(WS_PORT, driver)
    Thread(target=ws.serve_forever, args=(stop,)).start()

    handler = http.server.SimpleHTTPRequestHandler
    httpd = socketserver.TCPServer(("", HTTP_PORT), handler)
    Thread(target=httpd.serve_forever).start()

    try:
        while True:
            sleep(1)
    except KeyboardInterrupt:
        print('stopping')
        stop.set()
        httpd.shutdown()

if __name__ == "__main__":
    run()
Next challenge was creating the controller - I was aiming for a joystick that could be dragged around. Naturally flash, silverlight, and java apps were not considered a viable solution. After weighing up pros and cons of canvas and svg , I finally settled on a dynamic SVG. Plenty of javascript libraries exist for visualizations, the one I liked the most is called d3. Used by the New York Times to good effect last week creating: "Over the decades, how states have shifted".
The bulk of my javascript was made up of very simple drawing commands, the following section is responsible for creating a new websocket and after a connection to the car is made - binding the buttons to events:
function Car(){
    this.s = new WebSocket("ws://"+window.location.hostname+":9876");

    this.update = function(command, raw_command) {
        ...
        car.s.send(JSON.stringify({
            'duration': d,
            'command': command,
            'data': raw_command
        }));
    }

    this.s.onopen = function() {
        /* Register callbacks for each control button */
        d3.selectAll(".command_button")
            .on("click", car.update)
            .on("click", car.display);
    }

    this.s.onclose = function() {
        console.log("Connection closed.");
    }

    this.s.onmessage = function() {
        console.log("Received: " + e.data);
    }

    this.display = new JoystickDisplay(d3.select("#direction"));

}
To create the buttons I had mapped an array of button names ["left", "right", etc] as data:
d3.select(".controls").selectAll("button")
        .data(commands)
      .enter().append("button")
        .attr("class", "command_button")
        .text(function(d) { return d[0].toUpperCase() + d.slice(1); });
So the d3.selectAll(".command_button").on("click", car.update) line is almost misleadingly powerful - it is passing that original bit of data used in creating the button through to car.update, since this data was the command name that function can json encode it and send it down the websocket to the server. Too easy!

So although it might not look like much, I was rather proud to drive my bt remote control car via a websocket. The html and javascript can be found at car.html in my bitbucket repository for socket examples.
I found Google Chrome was much much faster than Firefox. If the red "knob" had opacity in firefox it wouldn't render it properly as a circle! That has me a bit worried, luckily this was just a "toy" for myself and I happen to be a Chrome user.
