Deploying small web applications can take up more time than creating the application itself, for this reason I've put together this small guide to document how I go about deploying applications. I've used this method for things like small business sites, demo sites and application prototypes. Although we will go through a Python Flask application the same method would apply to other micro web apps.
The final running application will have a few moving parts, here is how it will handle two incoming requests:
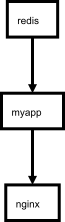
 Our final implementation will comprise three Docker containers:
- Our frontend reverse proxy server - nginx
- Our WSGI server Gunicorn and application server Flask
- An example ancillary service - a redis cache
To follow along grab the code from https://github.com/hardbyte/python-app-deploy
In this post we’ll create a small standalone flask application that uses redis for a cache. The same deployment method works for applications that require services like
We build the docker image and test it locally. Here we just use a stock standard redis container from dockerhub, and use Docker’s linking mechanism to facilitate connecting the two containers. When we create these container links we can use specific names on the system (
So to do this we will add another docker container into the mix. I’ve created a top level folder
The
Now we’ve added
 Most modern linux operating systems now use
The remaining piece of the puzzle is creating systemd
Due to the docker containers having required links, we will create services with the same dependencies. One to run each of redis, the app, and nginx.
The service files are available on github, we will just show one service file in full.
The Requires and After statements are both required. Because we are launching docker containers we rely on the
Note directives with
These service files have to be both enabled and started before systemd will know to run the docker containers at boot. To do this we have to copy the service files to
The final running application will have a few moving parts, here is how it will handle two incoming requests:

- Our frontend reverse proxy server - nginx
- Our WSGI server Gunicorn and application server Flask
- An example ancillary service - a redis cache
To follow along grab the code from https://github.com/hardbyte/python-app-deploy
In this post we’ll create a small standalone flask application that uses redis for a cache. The same deployment method works for applications that require services like
memcached, postgresql, etcd.Start small
So first up we write and test the application locally. Our flask app is just one file - here on github. The application will just have two endpoints:/bump and /hits. We will skip the implementation details for now (see them on github) and jump straight to building a docker image ready for deployment. We will serve our app using the WSGI HTTP server gunicorn. In the Dockerfile we install the package requirements, copy over the Python files and bind to port 5001:FROM python:3.5
# If you have a src folder add that instead
ADD . /var/www
COPY requirements.txt /var/www/requirements.txt
WORKDIR /var/www
RUN pip install -r requirements.txt
EXPOSE 5001
# Useful for debugging
#CMD python3 server.py
# Serve using gunicorn
# Note this should additionally be behind nginx
CMD gunicorn server:app -w 4 -b 0.0.0.0:5001We build the docker image and test it locally. Here we just use a stock standard redis container from dockerhub, and use Docker’s linking mechanism to facilitate connecting the two containers. When we create these container links we can use specific names on the system (
myapp-redis) but then internally expose them more generically as e.g. redis. This becomes very useful if we deploy multiple applications on a single server.docker build -t hardbyte/myapp-server
docker run -d --name myapp-redis redis
docker run -d --name myapp -p 5001:5001 --link myapp-redis:redis hardbyte/myapp-serverAdding a proxy server
Next we want to put a proxy server such as nginx in front of our application server, this will help protect our application from DDOS attacks by buffering slow clients. Do read through the deployment documentation for gunicorn yourself though!So to do this we will add another docker container into the mix. I’ve created a top level folder
myapp-nginx which is where we will put our nginx configuration files and the nginx Dockerfile.The
Dockerfile is really simple (github) - we just copy the configuration directory and any static assets to the image. The more interesting part is the nginx configuration file nginx/default.conf which contains the routes:server {
listen 80;
location / {
# Pass the request to Gunicorn/Flask app
proxy_pass http://backend:5001;
proxy_redirect off;
proxy_set_header Host $host;
proxy_set_header X-Real-IP $remote_addr;
proxy_set_header X-Forwarded-For $proxy_add_x_forwarded_for;
}
# Serve our static files too
location /static/ {
alias /usr/share/nginx/html/;
}
}/static often this is switched around - we could easily have the backend at e.g., /api, and the website being served on root (/).Now we’ve added
hardbyte/myapp-nginx into the mix we have to link the nginx container to our application backend and finally we might want to serve traffic on port 80. Build or pull the docker image as before and start the container with:docker run -d --name myapp-nginx -p 80:80 --link myapp:backend hardbyte/myapp-nginxDeploy with systemd
Once we have the containers all working locally there are a few directions in which we can go for actually deploying the application. We don’t want to have to manually ssh into a server and run the docker commands. We want to make sure if the server restarts that so do all our docker containers. For this post we will assume just a single web server, however a future post will talk about deploying on a cluster. Most modern linux operating systems now use
 systemd to handle running services. One such lightweight server operating system is CoreOS, it comes with a solid security model and predictable automated update behaviour. If you don’t have access to a machine with systemd it is very easy to spin up a coreos VM on your favourite cloud provider.The remaining piece of the puzzle is creating systemd
.service files, they comprise the instructions to the server on how to run, stop, restart, and initialize services. Each service is very similar, they each pull their docker image, and run a container with the appropriate command line incantation.Due to the docker containers having required links, we will create services with the same dependencies. One to run each of redis, the app, and nginx.
The service files are available on github, we will just show one service file in full.
The Requires and After statements are both required. Because we are launching docker containers we rely on the
docker.service.
myapp.service - An example systemd service File
[Unit]
Description=My App Server

# Requirements
Requires=docker.service
Requires=myapp-redis.service

# Dependency ordering
After=docker.service
After=myapp-redis.service

[Service]

# Let processes take awhile to start up (for pulling initial Docker containers)
TimeoutStartSec=500

KillMode=none

ExecStartPre=-/usr/bin/docker kill myapp-server
ExecStartPre=-/usr/bin/docker rm myapp-server

ExecStart=/usr/bin/docker run --rm --name myapp-server --link myapp-redis:redis hardbyte/myapp-server

ExecStop=/usr/bin/docker stop myapp-server

[Install]
WantedBy=multi-user.target
Note directives with
=- are allowed to fail, this is useful because docker complains when trying to rm containers that don’t yet exist.These service files have to be both enabled and started before systemd will know to run the docker containers at boot. To do this we have to copy the service files to
/etc/systemd/system/.systemctl enable myapp
systemctl start myappModification if using a private Docker repository
If you use a quay.io account, just add these ExecStartPre commands to login to quay.io. Robot accounts are a good idea here too!ExecStartPre=-/usr/bin/docker login -e="." -u="quayaccount+myapp" -p="PASS" quay.io
ExecStartPre=-/usr/bin/docker pull quay.io/quayaccount/myapp-serverAccessing logs and containers’ stdout
You can usejournalctl to get the logs that systemd collects, or as these are just normal Docker containers running on a single host we can use docker logs. Consider mounting a logging directory from the host machine to collect logs outside of docker.Brief cloudy diversion
I usually have another couple of layers in front of nginx which I’ll briefly mention:- AWS Load Balancer - Even when deploying on a single machine a load balancer is useful as it can monitor server health and alert you when your appliction is down.
- AWS CloudFront - Backed by the ridiculously reliable S3 service this can serve your static assets from edge locations all around the globe.
How do you deploy?
We have explored a couple of powerful tools for deploying web applications to a single server so you end up with a reliable running application. Automated deployment is a big issue that I’ve not mentioned, a great start is to have a continuous delivery pipeline that tests code and then builds and uploads new docker containers. A sidekick service can be written that will update the server too. As you’d expect with additional servers you can dramatically increase the reliability, but if anyone else has different ideas for single server deployment please share them with me by commenting or mentioning me on twitter@thorneynz.